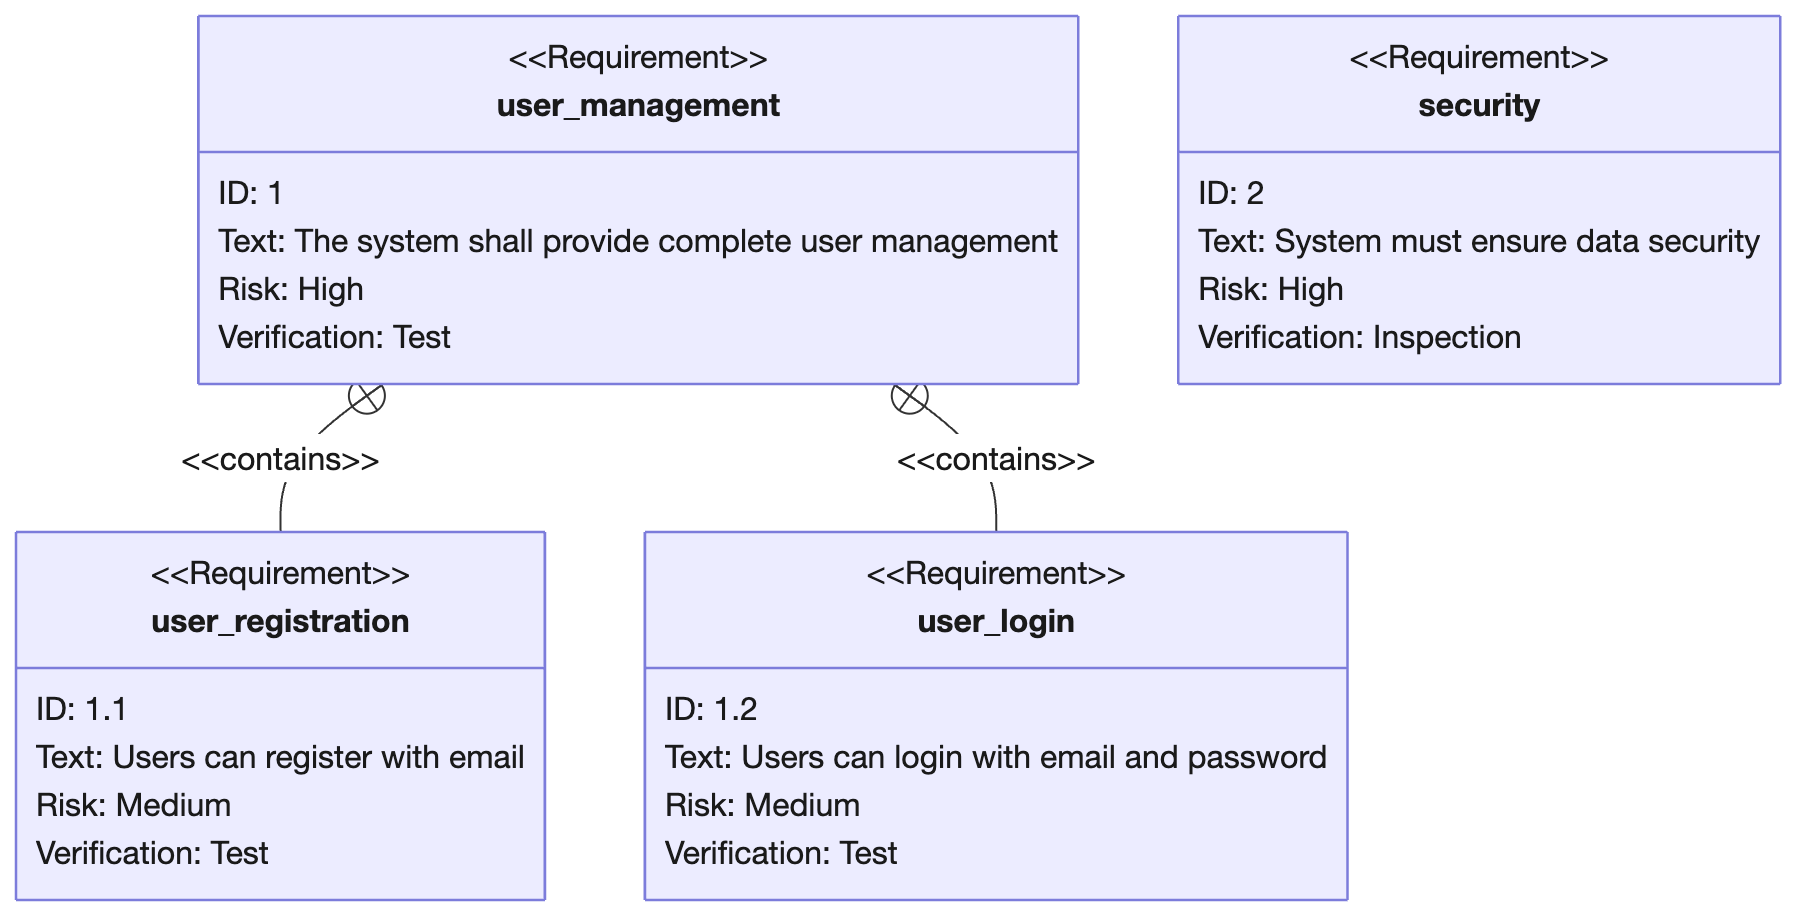
What You Will Learn
How to recognize when Requirement Diagram is the right Mermaid diagram, write the opening declaration, and shape a readable first version.
Best Fit
Compliance documentation, Safety-critical systems, Product requirement traceability.
Start Here
Copy the starter example, replace labels with your domain language, then simplify anything that does not help the reader.
Syntax Basics
Start with the diagram declaration, then add the smallest set of labels, relationships, and annotations needed to communicate the idea.
- Use requirementDiagram as the declaration.
- Declare requirements with id, text, risk, and verification method.
- Connect elements with traces, contains, satisfies, and verifies.
- Keep requirement ids stable.
Official Documentation Coverage
The Mermaid documentation for Requirement Diagram covers the following syntax areas. This tutorial condenses those topics into practical guidance for day-to-day documentation.
Requirement blocks
Requirement blocks is part of the official Mermaid Requirement Diagram syntax surface. Add it when the starter example needs more precision for production documentation.
Elements
Elements is part of the official Mermaid Requirement Diagram syntax surface. Add it when the starter example needs more precision for production documentation.
Markdown formatting
Markdown formatting is part of the official Mermaid Requirement Diagram syntax surface. Add it when the starter example needs more precision for production documentation.
Requirement relationships
Requirement relationships controls how elements connect. Treat these connections as the main information layer, and label them when direction, ownership, or meaning is not obvious.
Direction
Direction is part of the official Mermaid Requirement Diagram syntax surface. Add it when the starter example needs more precision for production documentation.
Styling
Styling is part of the official Mermaid Requirement Diagram syntax surface. Add it when the starter example needs more precision for production documentation.
Class definitions
Class definitions defines the named objects in the diagram. Keep names stable, domain-specific, and short enough to remain readable in exported images.
Traceability
Traceability is part of the official Mermaid Requirement Diagram syntax surface. Add it when the starter example needs more precision for production documentation.
How This Tutorial Uses The Official Docs
Mermaid syntax evolves, so the official page remains the primary reference. This tutorial turns that reference material into an authoring workflow, review checklist, and production guidance.
Start with the official grammar
The official Mermaid Requirement Diagram page is the source of truth for syntax changes. Use this tutorial to choose the right authoring pattern, then confirm exact keywords and edge cases in the official reference.
Prioritize the core sections
For the first pass, focus on Requirement blocks, Elements, Markdown formatting, Requirement relationships. These sections usually explain the minimum structure required for a valid Requirement Diagram.
Add advanced syntax only when it earns its space
Treat Direction, Styling, Class definitions, Traceability as optional layers. They are valuable when the diagram needs precision, but they should not make the first version harder to read.
Syntax Reference Map
Use this map as a practical reading order for the official syntax page. It separates the first concepts to learn from the advanced details that are better added after the diagram already communicates the right idea.
Requirement blocks is part of the official Mermaid Requirement Diagram syntax surface. Add it when the starter example needs more precision for production documentation.
Does this requirement blocks detail make the requirement diagram easier to understand or maintain?
Elements is part of the official Mermaid Requirement Diagram syntax surface. Add it when the starter example needs more precision for production documentation.
Does this elements detail make the requirement diagram easier to understand or maintain?
Markdown formatting is part of the official Mermaid Requirement Diagram syntax surface. Add it when the starter example needs more precision for production documentation.
Does this markdown formatting detail make the requirement diagram easier to understand or maintain?
Requirement relationships controls how elements connect. Treat these connections as the main information layer, and label them when direction, ownership, or meaning is not obvious.
Does this requirement relationships detail make the requirement diagram easier to understand or maintain?
Direction is part of the official Mermaid Requirement Diagram syntax surface. Add it when the starter example needs more precision for production documentation.
Does this direction detail make the requirement diagram easier to understand or maintain?
Styling is part of the official Mermaid Requirement Diagram syntax surface. Add it when the starter example needs more precision for production documentation.
Does this styling detail make the requirement diagram easier to understand or maintain?
Class definitions defines the named objects in the diagram. Keep names stable, domain-specific, and short enough to remain readable in exported images.
Does this class definitions detail make the requirement diagram easier to understand or maintain?
Traceability is part of the official Mermaid Requirement Diagram syntax surface. Add it when the starter example needs more precision for production documentation.
Does this traceability detail make the requirement diagram easier to understand or maintain?
How To Study The Official Syntax
The official Mermaid page is broad because it documents the full parser surface. For a working tutorial, read it in passes instead of trying to memorize every option at once.
Skim the official Requirement Diagram documentation once to understand the full syntax surface before copying examples into production docs.
Focus first on Requirement blocks, Elements, Markdown formatting, Requirement relationships, Direction because these topics usually explain the core authoring model.
After the first diagram renders, revisit the official styling, configuration, and advanced sections only when the diagram needs that extra precision.
Authoring Workflow
This workflow turns the official syntax reference into a repeatable writing process for docs, specs, and product pages.
Frame the reader question
Before writing syntax, decide what question the Requirement Diagram should answer. Good diagrams usually answer one question clearly instead of answering several partially.
Draft the smallest valid diagram
Start with the declaration for requirementDiagram, add only the required elements, and render it before introducing advanced styling or configuration.
Add semantic labels
Replace placeholder names with business or system language that readers already know. Labels should reduce explanation work.
Review for maintenance
Remove details that are likely to drift quickly. If a value, date, or dependency changes often, explain who owns the update.
Quick Syntax Cheat Sheet
Use this compact reference when you already know the goal and need to write a valid Mermaid Requirement Diagram quickly.
requirementDiagramStart the code block with requirementDiagram so Mermaid selects the Requirement Diagram renderer.
Use requirementDiagram as the declaration.Add the smallest number of statements that express the main idea before adding visual polish.
Connect elements with traces, contains, satisfies, and verifies.Use connections only where they explain ownership, sequence, flow, dependency, or hierarchy.
Requirement blocksUse official syntax topics as optional layers, not as requirements for every diagram.
Practice Prompts
Use these prompts after reading the official syntax sections. They force the diagram to stay practical instead of becoming a syntax inventory.
Create a Requirement Diagram for compliance documentation using no more than eight visible elements.
Rewrite the starter example with labels from your own product or engineering domain, then remove any line that does not change the reader's understanding.
Add one official syntax feature from Requirement blocks, Elements, Markdown formatting and explain why that feature makes the diagram clearer.
Compare the result with state-diagram and gantt and write one sentence explaining why Requirement Diagram is still the better fit.
Examples
Copy the example into the Mermaid editor, then adjust labels and relationships for your own documentation.
Login Requirement
A minimal traceability example.
requirementDiagram
  requirement auth_req {
    id: 1
    text: Users must sign in securely
    risk: high
    verifymethod: test
  }
  element login_ui {
    type: interface
  }
  login_ui - satisfies -> auth_req
Example Walkthrough
Read Mermaid examples from top to bottom. The first meaningful line usually selects the diagram parser; the following lines add labels, relationships, values, states, or layout hints.
requirementDiagramThis line declares the Mermaid diagram type, which tells Mermaid which parser and renderer to use.
requirement auth_req {This line configures structure, labels, sections, participants, axes, or reusable diagram elements.
id: 1This line adds a relationship, transition, message, data value, or visual item to the diagram.
text: Users must sign in securelyThis line adds a relationship, transition, message, data value, or visual item to the diagram.
risk: highThis line adds a relationship, transition, message, data value, or visual item to the diagram.
verifymethod: testThis line adds a relationship, transition, message, data value, or visual item to the diagram.
}This line adds a relationship, transition, message, data value, or visual item to the diagram.
element login_ui {This line configures structure, labels, sections, participants, axes, or reusable diagram elements.
When To Use Requirement Diagram
Diagram Choice Guide
A strong Mermaid tutorial should also explain when not to use the diagram type. Use this guide before adding a Requirement Diagram to a public page or technical design document.
Use this diagram when
Requirement Diagram works best for compliance documentation, safety-critical systems, product requirement traceability. It should make the reader's next decision easier, not merely decorate the page.
Choose a different diagram when
Your main question is better answered by another structure, such as state-diagram, gantt, class-diagram. For example, use a sequence diagram for message order and a flowchart for branching process logic.
Keep it maintainable by
Keeping the first version small, naming every important element with business language, and linking back to the official Mermaid syntax page when advanced syntax is required.
Production Checklist
Before publishing a Mermaid Requirement Diagram, run through this checklist so the diagram remains useful after the immediate conversation is over.
Production Review Questions
Before shipping the diagram in public docs, compare it against the official syntax page and then ask whether each line helps the reader make a better decision.
Troubleshooting
Most Mermaid issues come from an incorrect declaration, a syntax feature used before the base diagram works, or a diagram that is trying to communicate too many ideas at once.
The diagram does not render
Check that the first line is the correct declaration for Requirement Diagram: requirementDiagram. Then remove advanced lines until the smallest version renders.
The diagram renders but is hard to read
Shorten labels, reduce the number of visible items, and split separate ideas into separate diagrams.
The meaning is ambiguous
Add edge labels, relationship names, axis labels, or surrounding explanatory text so readers know what the diagram is proving.
The diagram becomes stale
Prefer stable concepts over volatile implementation details, and add ownership notes when the diagram documents a changing system.
Publishing Notes
For SEO and long-term documentation quality, keep the Mermaid code close to the explanation. Search engines can understand the surrounding text, while engineers can copy the exact syntax into their own editor.
If the diagram is used in a product page, add a short caption that states what decision the diagram supports. If it is used in internal docs, add ownership and update expectations so the diagram does not become stale after the system changes.
Best Practices
- -Use durable requirement ids.
- -Keep requirement text testable.
- -Separate requirement diagrams by feature area.
- -Show verification relationships explicitly.
Common Mistakes
- -Writing vague requirements.
- -Using changing ids.
- -Mixing implementation tasks with product requirements.
Choosing Related Diagram Types
If Requirement Diagram does not quite match your communication goal, compare it with these nearby Mermaid diagram types.
State Diagram
State diagrams explain how an object, workflow, or UI moves between states. Use them when transitions and allowed events are the key information.
Gantt Chart
Gantt charts show schedules, task durations, dependencies, and milestones. Use them for lightweight project plans that should live close to documentation.
Class Diagram
Class diagrams describe object models, relationships, methods, and attributes. They are useful for documenting domain models and object-oriented design.
FAQ
Is Mermaid Requirement Diagram rendered on the server?
This tutorial page is server-rendered for SEO. The Mermaid syntax is shown as plain text so search engines and readers can inspect it without waiting for client-side rendering.
Can I edit this Requirement Diagram example?
Yes. Open the Mermaid editor, paste the example, and modify the labels, relationships, or values for your own use case.